Google Maps Builder Documentation by Najmul Iqbal v1.0
Google Maps Builder
Created: 07/03/2021
Modified: 07/03/2021
By: Najmul Iqbal
Email: iqbengsolution@gmail.com
Thank you for purchasing my app. If you have any questions that are beyond the scope of this help file, please feel free to email via my user page contact form here. Thanks so much!
Table of Contents
A) Overview - Top
Google Maps Builder is a .net desktop application that builds Google Maps without writing code manually. It creates a web page with a Google Maps using Maps Javascript API. It creates markers for all the locations you specify. It also displays an info window on marker click. It also converts addresses to lat/lng (geocoding) and lat/lng to addresses (reverse geocoding). It also allows to import a CSV file, geocode or reverse geocode it and creates markers for the locations in the file. It generates indented and readable code that can be easily changed as well.
B) Features - Top
- It creates a web page with a Google Maps without writing code manually.
- It adds markers based on the data you imports in the application.
- It also displays an info window on marker click.
- You can specify various settings like default zoom, minimum zoom, maximum zoom, map type and center of the map.
- It fits all the markers on the map when the map is first loaded (based on settings).
- It converts addresses to lat/lng (geocoding).
- It converts lat/lng to address (reverse geocoding).
- It imports data from CSV file.
- It uses the Google Geocoding API.
- It uses the Google Maps Javascript API.
- It supports single as well as multiple fields addresses i.e. you can have one field for the complete address or multiple fields like street, city, state, country and zip.
- It displays progress as the rows are processed.
C) How To Use? - Top
-
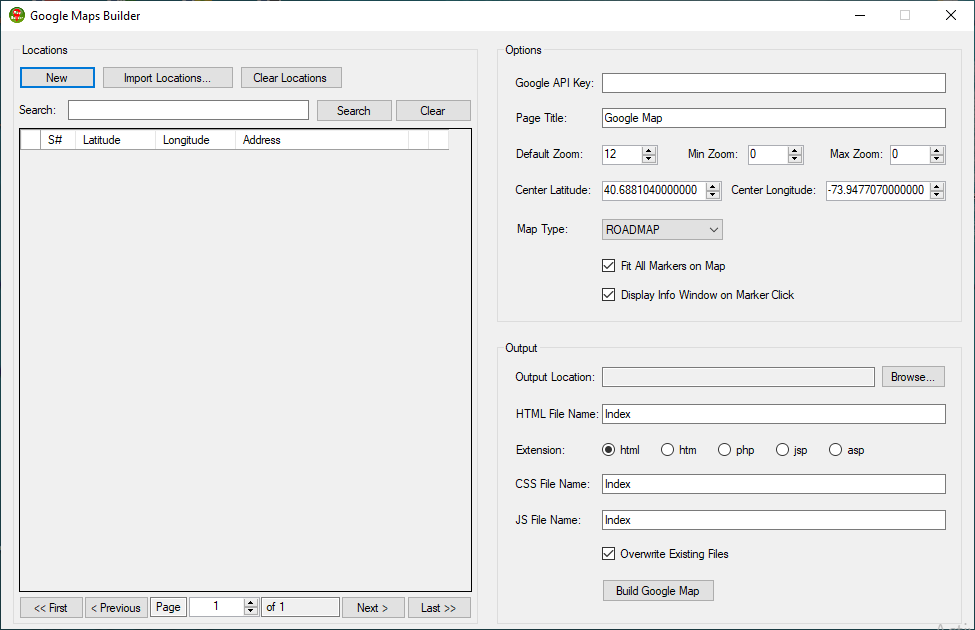
Open the application. The following main form appears.
-
Provide Options:
On the main form, there is a section 'options' where various options can be specified.- Google API Key: Create the Google Maps API key from the Google Console and then paste it in this field. Make sure to enable 'Geocoding API' and 'Maps Javascript API'. Later in this document, we show how to create Google Maps API key. You can also skip inserting the API key but when you open the generated web page, it will display a warning and will show Google Maps in the developer mode. If you skip the API key, you will also not be able to geocode or reverse geocode the locations. We also talk about this later in this document.
- Page Title: This is the title of the web page.
- Default Zoom: When the map is initially loaded in the page, it will show the map in the zoom specified by this field.
- Min Zoom: In this field you can specify minimum zoom of the map. If you specify '0', then minimum zoom is not set.
- Maz Zoom: In this field you can specify maximum zoom of the map. If you specify '0', then maximum zoom is not set.
- Center Latitude/Longitude: When the map is shown initially on the page, it will center the map based on the latitude/longitude values specified in these fields.
- Map Type: From this drop down list, you can specify the type of the map.
- Fit All Markers on Map: If this option is checked, then the zoom and center of the map will be set automatically to fit all the markers on the map.
- Display Info Window on Marker Click: If this option is checked, then an info window will be shown when the marker is clicked.
-
To add a new location, click New button.
It will show the following form.
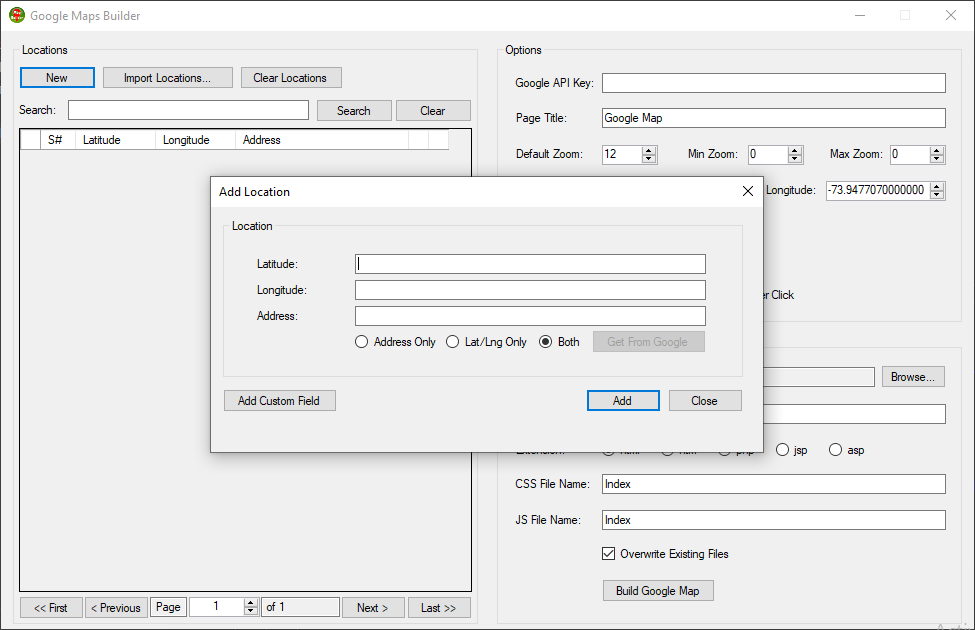
In the above form, there are three fields by default. All the three fields (Latitude, Longitude and Address) are required. If you have values of all the three fields, then fill in these fields and click the Add button. If you have only value for the Address field, then select Address Only option and enter address and then click Get From Google button. It will automatically get latitude and longitude values via the Google API. If you have latitude/longitude values but you don't have address, then select Lat/Lng Only option, enter latitude/ longitude values and click Get From Google button. It will automatically get address via the Google API. Note that if you have either not specified the API key on the main form or you have not enabled Geocoding API from the Google Console, then this option will not work. Also make sure that you have enabled billing from the Google Console. To add custom fields like 'Phone', 'Email', you can click the button Add Custom Field and add more fields as shown in below screenshot.
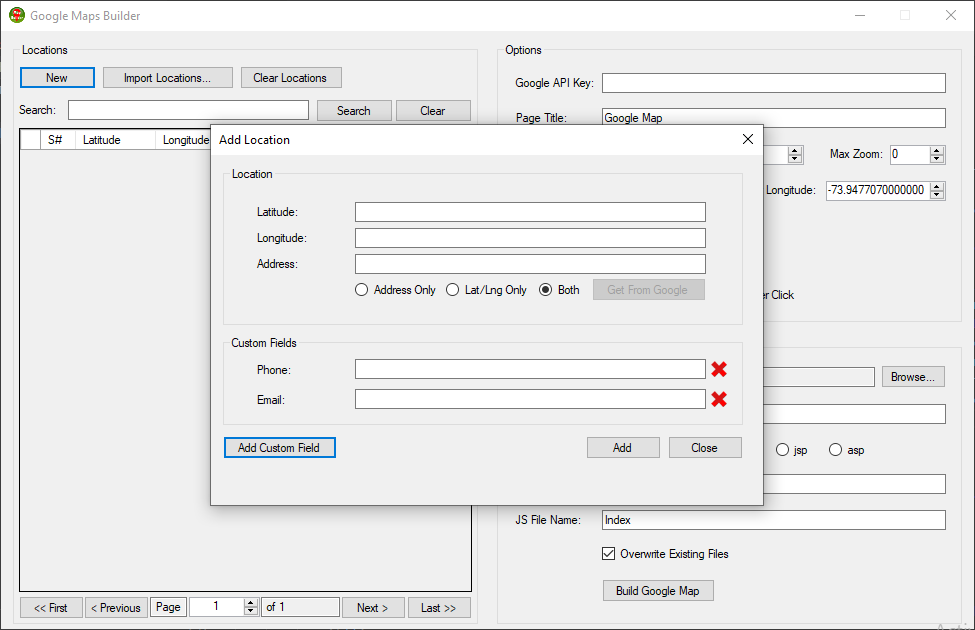
To remove a custom field, you can click the red cross icon on the right side of the custom field and then click Yes button from the confirmation dialog box. -
To import locations from a CSV file, click Import Locations button.
The following form will be shown.
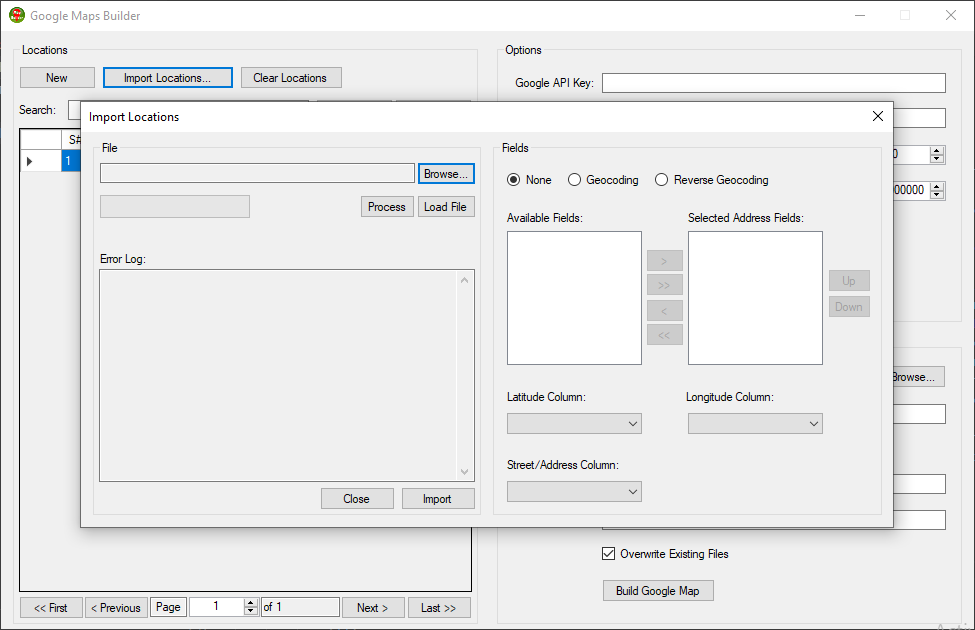
- Click Browse button and select a CSV file.
- Click Load button. This will display columns in the relevant fields.
- If you have a CSV file where all of the three columns i.e. address, latitude and longitude exist, then select None option and select name of the address, latitude and longitude columns in the relevant fields. Then click Import button to import all locations in the app.
-
If you don't have latitude and longitude columns in the CSV file but have address,
then select Geocoding option and move all the address related
fields from Available Fields list to Selected Address Fields
list as shown in below screenshot.
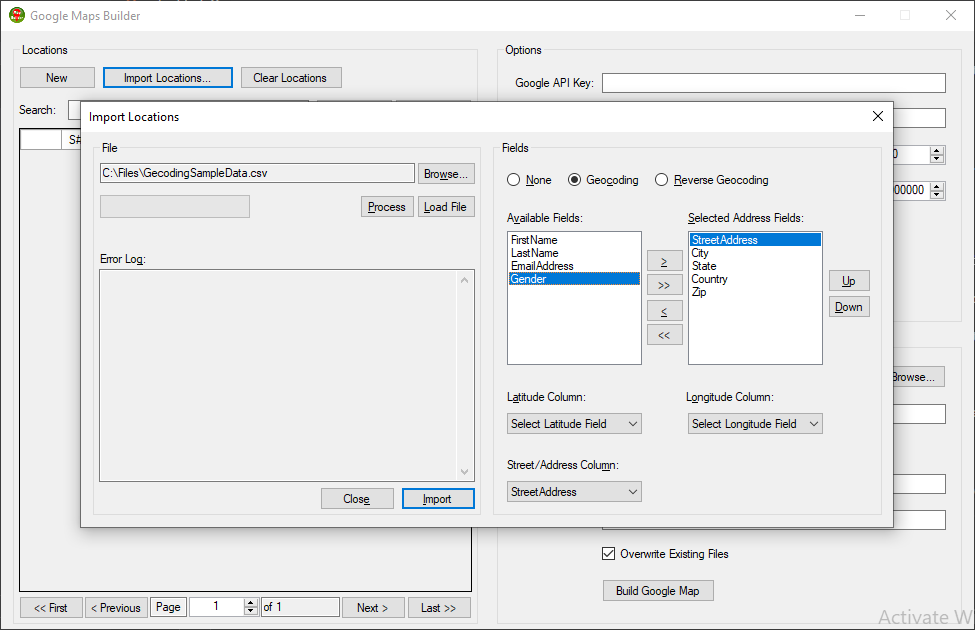
Then click Process button. All rows will be geocoded (latitude/longitude will be retrieved via Geocoding API) one by one and progress will be shown. A confirmation message will appear when all rows are processed. Click OK button from the confirmation dialog. Then click Import button. -
If you don't have address column in the CSV file but have latitude and longitude
columns, then select Reverse Geocoding option and select name of
the latitude and longitude columns from the drop down lists as shown in below
screenshot.
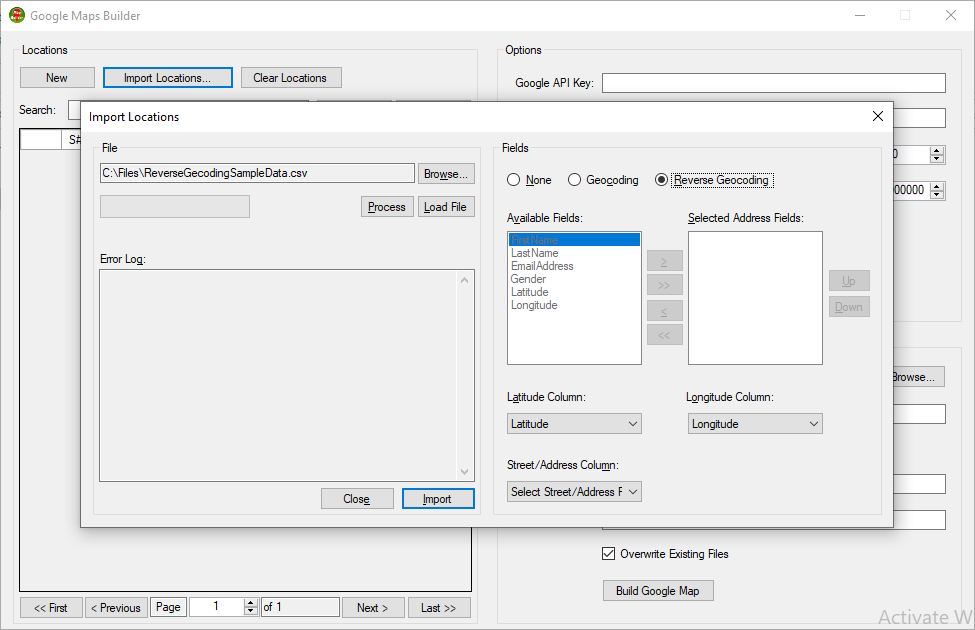
Then click Process button. All rows will be reverse geocoded (address will be retrieved via Geocoding API) one by one and progress will be shown. A confirmation message will appear when all rows are processed. Click OK button from the confirmation dialog. Then click Import button.

- To search for a location by latitude, longitude or address, enter the search text in the Search box and click Search button. To clear the search, click Clear button next to Search button.
- The pagination section, below the grid, can be used to navigate to next/previous, first/last or a specific page.
- To edit an existing record, click the pencil icon in the grid. It will display the row data in the form. Change the data and click Update button. The row will be updated and the form will be changed to add mode if you need to add a new record. Click Close button when you are done.
- To delete a record, click the red cross (X) icon and click Yes from the confirmation dialog.
- To remove all locations from the grid, click Clear Locations button and click Yes from the confirmation dialog box.
-
Specify Output:
In the output section, you can specify output related options.- Output Location: Click Browse button on the right side of the output location field and specify the output directory where you want to save the generated files.
- HTML File Name: Enter name of the generated HTML file/web page.
- Extension: It's extension/type of the file. For example, if you enter 'Index' as the HTML file name and select '.html' as extention, then the file name will be 'Index.html'.
- CSS File Name: It is name of the CSS file. Extension (.css) will be automatically added when saving the file.
- JS File Name: It is name of the Javascript file. Extension (.js) will be automatically added when saving the file.
- Overwrite Existing Files: If this option is checked, then existing files will be overwitten in the output directory.
- Click Build Google Map button to generate the files.
- Now go to the output directory and open the HTML file in the browser to see the result.
D) Google Maps API Key - Top
In order to add Google Maps to a web page, you need to generate the API key from the Google
Console. If you don't specify the API key, the Google Maps will be displayed in the developer
mode when you open the web page in the browser. You will also need to enable billing from the
Google Console. You also need to enable 'Maps Javascript API' and 'Geocoding API'. If you don't
enable 'Geocoding API', then geocoding and reverse geocoding will not work.
Please follow instructions on below page to create an API key.
https://developers.google.com/maps/documentation/javascript/get-api-key
E) Generated Code - Top
The app generates three files i.e. an HTML file, a Javascript file and a CSS file.
If you selected file extension other than .html/.htm for the web page, then you will
need to deploy the generated files on the appropriate server. In case of .html or .htm
extensions, you can directly open the file in the browser like Chrome, Safari or Edge.
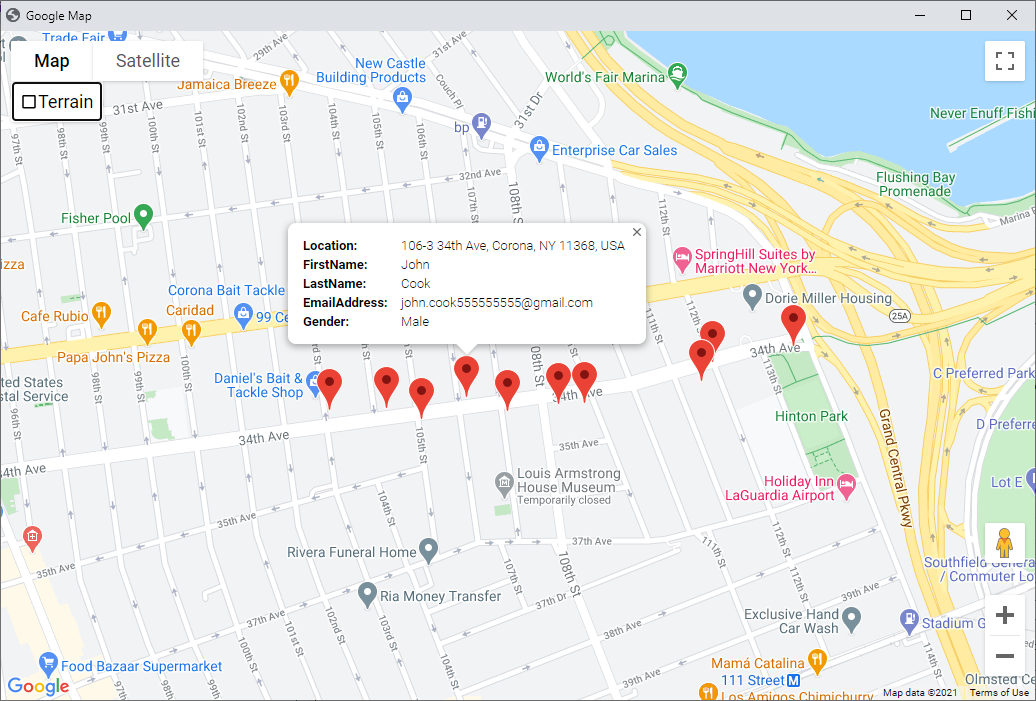
The following is an example output of the web page created.
F) Video Demo - Top
Please click the play button below to view the video demo.
G) Our Portfolio - Top
We also have other useful utilities, plugins and software products. Please click here to see our portfolio.
Once again, thank you so much for purchasing this app. As I said at the beginning, I'd be glad to help you if you have any questions relating to this app. No guarantees, but I'll do my best to assist. If you have a more general question relating to the apps on CodeCanyon, you might consider visiting the forums and asking your question in the "Item Discussion" section.
Najmul Iqbal